A Coastal Bachelor Pad
- Feb 14, 2016
- 3 min read
I know its been a while, but we're glad to be back! This time we share how we remodelled a 77 sqm 3-bedroom apartment into our version of a coastal bachelor pad. Perfect for a Valentine's Day post. <3
So, our client is a 50-something golfer that wanted to create a fresh start to his life. To give a new look and feeling to his old apartment, we tore down almost everything. Check out how we fixed it up!

BEFORE (above): The living area had a small, odd shape. So we had to make sure that a sofa and tv console could fit.
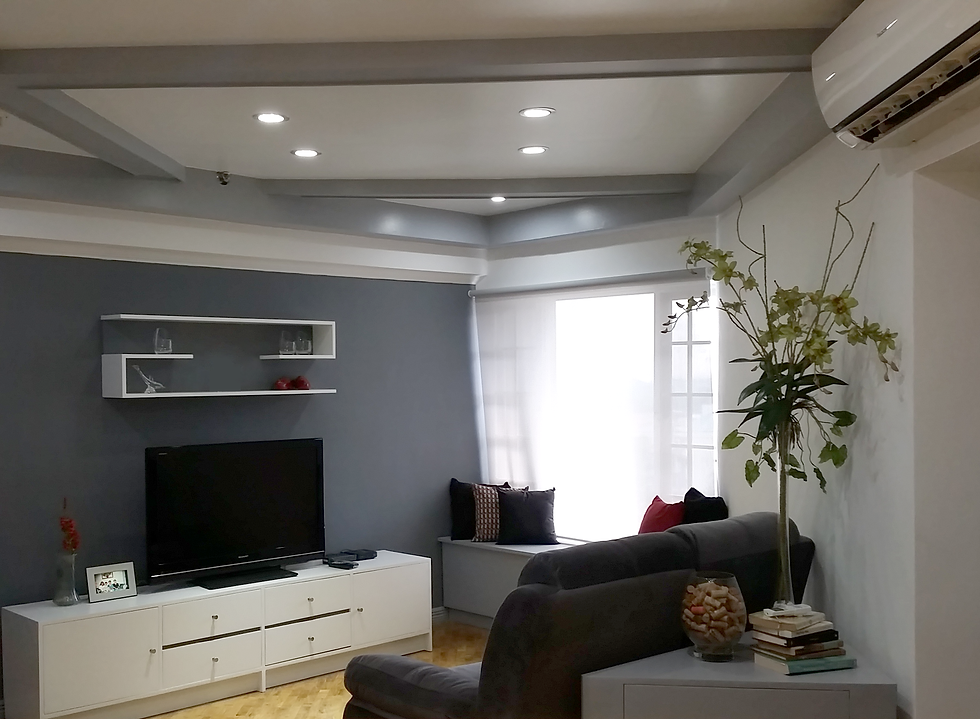
AFTER (above): We inserted our favorite coastal color of bluish grey to create an accent wall and give more character to the previous, flat ceiling.
Our client only wanted a 2-seater sofa, so we decided to give him a bench by the window with added storage; in case he has some guests over.
Also, since the wall was built at an angle, we had a small cabinet made to be placed behind the sofa so that he could watch TV without getting a neck ache.

(above) Here's a view of the TV console and bench seating that we had custom made.

Dining Area/Bar (above): These are the before and after photos of the Dining area / Bar. There was no space for a dining table so we decided to make the bar area big enough for a dining area as well. On one end, you can cook and then easily serve your guests that are on the other end.
The table is made of solid narra and probably our fave spot in the whole unit. The living area is right beside this making it easy to entertain guests.

Kitchen (above): We made this area completely functional; as it should be. Under the bar, on the left side, we made space for the washer/dryer and dishwasher. And on the right side was the oven, range, and ref. We even created a nook for displaying wine. Notice how we covered up those exposed pipes! By doing this we were also able to add more lighting to make the work area much brighter.

Before (above): This was the utility area by the kitchen. We had all the original cabinets torn out.

After (above): We wanted a clean look and decided to stick with white. Still fully functional with lots of storage space. On the right side, an ironing table folds out and a sink was placed in case laundry needs to be hand-washed.

Powder Room (above): This space was realllllly tiny. Thus we had to make use of a corner sink. Our client also insisted on placing a shower inside in case he has guests over. In order to save space, we decided to use a pocket sliding door.

Powder Room (above): This is a view of how small the area is!

Powder Room (above): This is actually the ante room to the Powder room. It doubles as a linen closet/dressing room as well.

Guest Room (above): This was a tiny area but we still needed to create a comfortable living space. We were able to add closet space on the left side and fit a single bed and a custom made side table.

Guest Room (above): Even with the small space, we were able to put a television across from the bed and add more storage space above and below it.
The unit initially had 2 rooms of this size. However, since the unit owner is now living alone, he decided to tear down one room and extend the master bedroom to make it even bigger.

Before (above). This is how the Master's Bedroom looked like before.

After (above): This is the Master's bedroom after with more space. We built him a TV system and closet space on each side of the room. We also built him window seating with storage and covered up the windows above so that we could install air conditioning units.
And of course, he wanted his own La-Z Boy Chair for when he watches sports on tv.

Master's Bathroom (above): We dropped portions of the ceiling to cover the pipes and added glass enclosures to make the bathroom look more modern.

Master's Bathroom (above): We built more storage space here for towels and toiletries. And then we added a mirror as well. Hello there! Sorry couldn't crop myself out ;)

Well, that wraps up another Coastal Unit! Hope you enjoyed as much as we did!
With love,
Michelle & Isa


Comments